
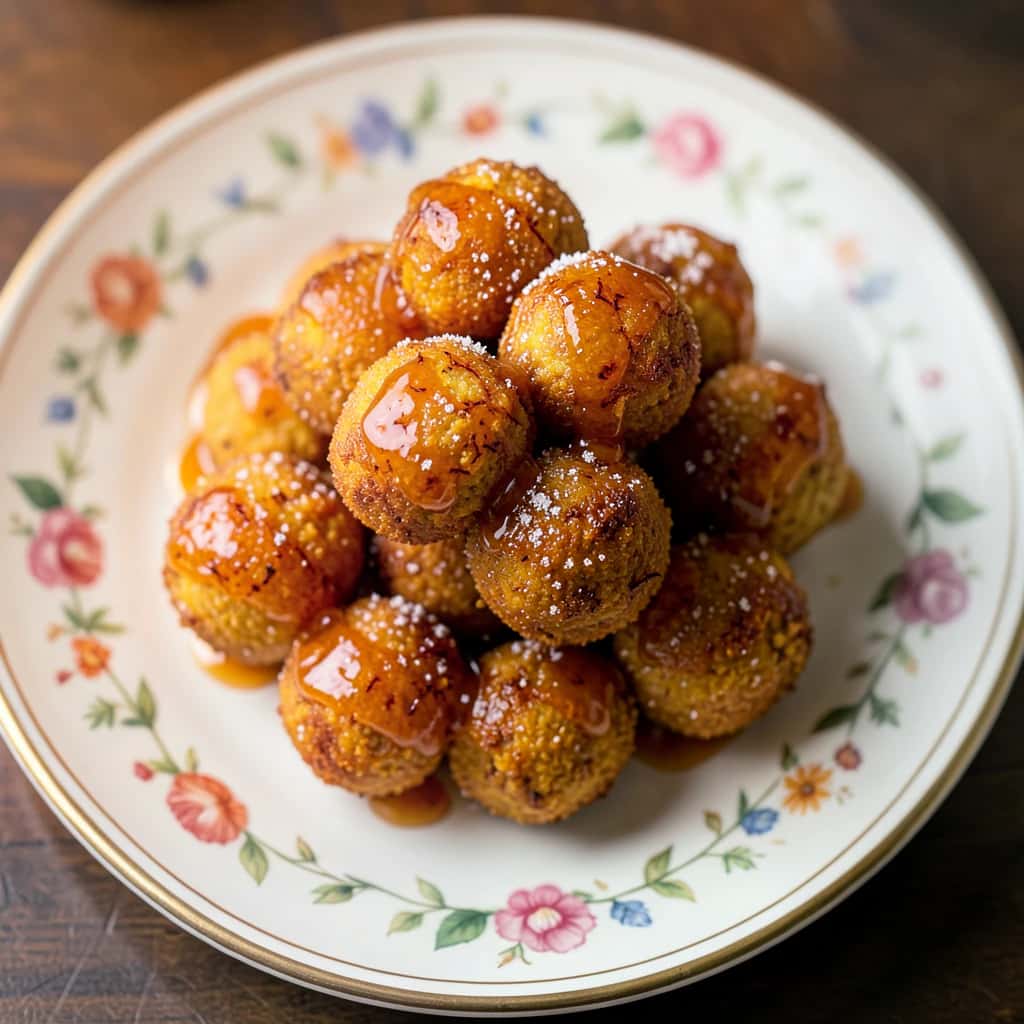
Moti Pak - A Dual-Flavored Boondi Burfi
A delightful dual-flavored Moti Pak, combining a mawa layer with boondis for an exquisite Diwali dessert.
Experience the unique taste of this traditional Indian sweet in a modern twist. Perfect for celebrating Diwali or any festive occasion.
Instructions
- 1
Combine sugar and water into a wide pan.
- 2
Bring it to a boil and add lemon juice to prevent crystallization.
- 3
Add saffron strands and cardamom powder to the cooking sugar syrup.
- 4
Allow the sugar syrup to simmer over medium heat until it reaches one-string consistency. It will take 7-10 minutes to get one string consistency.
- 5
Check consistency – take some cooled sugar syrup between your fingers, press the fingers down, and now open your fingers; if it forms a thick string between your fingers without breaking – sugar syrup is ready to use. Cover and set it aside.
- 6
Combine besan, food color, and a teaspoon of ghee in a mixing bowl.
- 7
Add a little water at first and make a lump-free thick batter.
- 8
Slowly and gradually add water to make a smooth, lump-free, and pourable batter. If the batter is of the right consistency, it will fall into the oil as even-sized tiny droplets, resulting in perfect motichoor boondi.Tip — Keep the besan consistency free-flowing — A free-flowing consistency of the batter is essential for making beautiful motichoor pearls. Also, make sure the batter has no lumps.
- 9
Since I didn’t have the right motichoor jhara, I converted my size 2 boondi jhara to a size 0 by wrapping it in aluminum foil. If you plan to use this method, please make sure the foil is tightly secured around the jhara.Then, using a push-pin, I created tiny holes through the jhara. This effectively served the purpose and helped me make my best Motichur Ladoos!
- 10
Heat oil in a pan. Always use a wide kadhai to fry the boondis. The kadhai should be wider than the size of the jhara. This way, when you tap the jhara over the kadhai, the batter falls straight into the kadhai rather than on the edges.
- 11
While frying the boondi, create a higher platform so that the jhara is 3-4 inches above the oil. I used a container lined with a thick cloth and then placed the jhara on top to support it.Tip — To make the perfectly round pearls/ boondi — The trick to make a perfectly round boondi is to hold the strainer just above the kadhai when dropping the besan into the oil through the sieve. The thick cloth underneath the container acts as a cushion when you vigorously shake the jhara over the oil to drop the batter in the oil. Ensure the handle of the jhara rests over the container and does not come in close contact with the hot oil in the kadhai.
- 12
Once the ghee/oil is hot, pour the batter through this jhara. Shake it vigorously (up and down) over the oil so that the whole batter drops through those holes as tiny droplets.
- 13
Once the boondi is in oil, you have very little time.Fry them for a minute, then remove them immediately before the boondis start to change color. Do not over-fry the boondis.
- 14
Use a fat skimmer to collect the fried boondis.Tip — We do not need crisp boondi for motichoor. Since they are very tiny in size, they will cook fast; therefore, be quick in removing the motichoor boondi from oil at the right time.A crisp boondi is not good for motichoor ladoos.
- 15
Always drain fried boondi onto a paper-lined plate to ensure that extra oil is drained from the boondis. Spread the boondi in a single layer over the paper napkin to drain maximum oil. To prevent the fried boondi from drying out, cover the boondi with a lid while you fry the whole batch.
- 16
Perfectly shaped motichoor boondis are ready for the sugar syrup.
- 17
If the sugar syrup has cooled down, bring it to a quick boil. Lower the heat to the lowest setting, then add the fried motichoor boondis to this pan.
- 18
Cook the boondi for 1-2 minutes at the lowest setting, stirring continuously. This way, the boondi will become soft and soak in the sugar syrup.
- 19
Take the pan off the heat, cover, and let it rest for an additional 1-2 minutes.
- 20
The mixture should bind well when pressed. Cover and set it aside.
- 21
Heat ricotta cheese over medium-low heat in a heavy-bottomed pan.
- 22
Stir continuously. Soon the cheese will start to melt and spread.
- 23
Use a big spoon because the cheese will start to splatter as it bubbles. Do not leave the mixture unattended; stir constantly.Tip — Continuous stirring prevents burning: The ingredients tend to get burnt when left unattended, even for a while. Therefore, keep stirring the mawa mixture for evenly cooking without burning.
- 24
Keep stirring until the moisture starts to evaporate. The whole process will take about 15-20 minutes over medium-low heat.
- 25
Now add ghee to the pan and stir to combine. Soon, the mixture will start to thicken and start to leave the sides of the pan.
- 26
Add milk powder to it.Tip — Ensure the mixture is warm before adding milk powder and sugar to mawa. If milk powder and sugar are added to the hot mawa, the mixture will become runny and difficult to work with.
- 27
Mix until combined. Turn off the heat.
- 28
Add powdered sugar and cardamom powder.
- 29
Mix it well until the sugar is thoroughly combined with other ingredients, forming a homogeneous mixture.
- 30
Once the mawa mixture has cooked well, it comes together in the pan. This is the right time to remove the mixture from heat, as cooking for a longer duration will turn the mix dry.Tip — Make sure to make the mixture lump-free — Lump-free dough makes a smooth and luscious milk mawa layer with a melt-in-mouth texture.
- 31
Transfer the mixture to a bowl. Let it cool.
- 32
Once it is cooled, knead the dough briefly for 2-3 minutes with the heel of your hand. Tip — Knead the mixture for smoothness — Kneading the mawa dough removes any graininess from the mixture and lends melt-in-mouth smoothness to the mawa mixture.
- 33
Knead until you get a smooth mawa dough.
- 34
Grease a tray with ghee or unsalted butter.
- 35
For easy slide-out of the moti pak pieces, line the tray with parchment paper and grease it before setting the motichoor layer, which will facilitate the slide-out of the burfi.
- 36
Divide the motichoor mixture into two equal parts. Transfer one layer to this greased pan.
- 37
Using a spatula, spread it around into a thick burfi. As you spread, press and pack the mixture down firmly. The pressed motichoor mix will look like a thick block. Smoothen the top layer and edges with the spatula.Tip — Warm mixture holds better shape. For better layering of the motichoor mix, ensure that the mixture is warm and not very hot. Warm boondi can be shaped into the burfi easily.
- 38
Now, spread the mawa mixture over the flattened motichoor barfi layer and ensure that this layer is also pressed down tightly.
- 39
Put the other motichoor layer on top to make a sandwich. Spread and press this layer down firmly.
- 40
Tightly pack the barfi when setting: When setting the burfi in the tray, ensure that all the layers are pressed tightly, as the loosely set mixture will result in a crumbly burfi.
- 41
Decorate the Moti Pak burfi as you please. I have added some silver leaf, cardamom powder, and crushed pistachios as a garnish.
- 42
You can go creative with the kind of decoration that lures you. Cover it with plastic wrap and set it in the fridge for 2-3 hours.
- 43
Once set, remove the Moti Pak from the tray.
- 44
Cut the Moti Pak into your desired shape to create individual sandwiched burfis.
- 45
Serve and enjoy!
- 46
This decadent dessert is mouth-watering and emanates festive vibes that perfectly resonate with the celebrations.
- 47
Perfect for gifting too!
Ago's Notes
- Adjust salt to taste based on your canned goods.
Each bite of golden-gleaming Moti Pak dances with textures and sweetness, transforming simple ingredients into a warm, caring celebration. It's a perfect blend of modern innovation and traditional flavors—just like the essence of Diwali itself. Enjoy every spoonful of this decadent dessert.


How much of a capolavoro is this?
Share your opinion. Ago will say it the Italian way.
Pick a hand and tell Ago what you think.
Related Recipes

Sicilian Cassata
Experience the traditional flavors of Sicilian cassata, where fresh ricotta and rich chocolate come together in perfect harmony.

Lemon Cake
Juicy lemon sponge cake, creamy mascarpone cheesecake filling, and a touch of lemon curd on top: this lemon cake tastes heavenly!
Rum Babà: Soft & Fragrant Italian Delicacy
Rum Babà is a classic Neapolitan dessert with a soft, spongy dough soaked in aromatic rum syrup.